Main menu

The main menu consists of the following items:
  1. Contractors
  2. Operations
  3. Messages
  4. Data synchronization
  5. System Information
  6. System settings

2.1. Main menu -> Contractors

The “Contractor” menu consists of the following items:

1)Contractors base

2)Map

3)Routes

4)Menus

2.1.1. Contractors base

Designed to work with a common list of points of sale attached to this employee.

The list of all counterparties is arranged in alphabetical order. 

Between these tabs, you can move either by clicking on the panel or scrolling left and right.

On this screen you can

  1. Scroll all Contractors (up / down)
  2. Filter by category

Figure 2.1.1. Contractors base, list settings menu, searching, adding a new Contractor

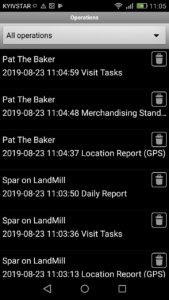
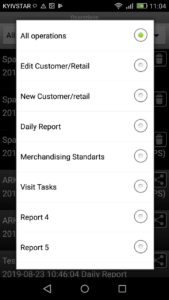
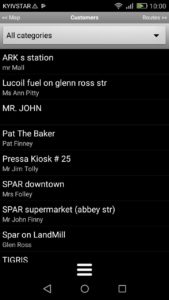
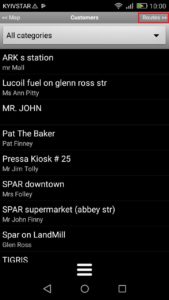
The employee can configure this list as it suits him by choosing in the menu list customization .
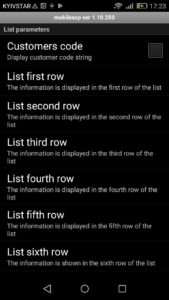
In the list settings menu, the employee sets the lines that will be reflected in the contractor base by selecting an attribute from the previously created contractor card from the pop-up list (Fig. 2.1.2.). In total, six lines can be displayed. If the contractor Code is specified, it can also be displayed in the list of contractors by checking the corresponding line.

If an employer needs one or two lines for convenient search, he simply does not need to select anything from the pop-up list in the remaining lines, so that the line does not appear select “Do not display row”.

Figure 2.1.2. Setting up a list of Contractors

2.1.2. Map

In order to view “All contractors” on the map, you need to go to the “Map” menu in the upper left corner (Fig. 2.1.3. On the left). This map is used to build the optimal route. How to build routes read p. 4.2.

Figure 2.1.3. Map of "Contractors base"

2.1.3. Routes

Go to “Routes” menu which is located in the upper right corner (Fig. 2.1.4. Left), an employee will see his route by contractors till the current date. For more details on what is the “Route list” and how it is created, read further in p. 4.1

Figure 2.1.4. Route of an employee of the “Counterparty Database”

2.1.4. Menu

Внизу Вы найдете дополнительное меню оно выглядит так:

Down below, you can see additional menu which looks like that: With this menu You can as said earlier in p. 2.1.1.

 – set up list of contractors;

– find the right contractor from the fields displayed in the contractor base;

– add a new contractor, how to add a contractor see in p.3.1. 

– аand also, the list of contractors can be reflected by the categories of conterparties, if any are specified in the WEB interface.

2.2. Main menu -> Operations

Contains a list of all operations that were performed by an employee. At the same time, a number of operations will be grey (these are operations that have already been sent to the center and you can only watch them), black ones have not been sent yet – they can be edited. Operations can be filtered by type. Clicking on an operation leads to its viewing or editing.

Figure 2.2. Operations Menu

2.3. Main menu -> Messages

Contains a list of all messages sent to the employee. These messages are created and sent by the administrator of the WEB-interface.

Figure 2.3. Messages Menu

2.4. Main menu -> Data Sync

There are two types of synchronization. 
  1. Send data. At the same time, we do not update any basic directories, but only send all our reports to the center. We recommend doing after reaching each point
  2. Update the data. Full synchronization, with sending reports and updating reference information. We recommend doing it once a day before starting work.
The screenshots show the different stages of synchronization. The synchronization procedure is successful when the message DATA UPDATE PROCEDURE IS COMPLETED

Figure 2.4. Data Sync Menu

Connection type:
  1. Mobile network. It is should be understandable that an internet connection is being used. You should always have a tick on mobile data transfer turned on on your device. IMPORTANT! If at the current moment of time you manually set up WI-FI connection, then WI-FI will be used. Connection type is optional!
  2. Wi-fi network. ДThis type is selected to save time, if you have the Wi-FI Internet option turned off on your phone to save battery. Then our software will enable this option, try to find a known Wi-FI network and transfer data.

2.5. Main menu -> System Information

This menu contains information about the device. If the employee installs the application remotely on the device, then to connect the device, go to the “System Information” menu and click the “Send” button. Then, in the pop-up menu, select the sending channel, for example, mail or another proposed messenger. And send to the administrator to connect the device to the system. If messengers are not installed on the device, you can simply dictate the code that is written in the line “Device ID”. In fig. 2.5. (left) Device ID: TEST_IOS_DEVICE

Figure 2.5. System Information Menu